IDM Crack Tool

Posted by Unknown Sabtu, 29 Juni 2013 0 komentar


နံမည္ေလးက ဆန္းသလို
သူ႕ရဲ႕လုပ္ေဆာင္ႏိုင္စြမ္းကလည္း
အံ့မခန္းပါပဲ ...
Internet Download Manager ရဲ႕
ဗားရွင္းမွန္သမွ်ကို Full Version ျဖစ္ေအာင္
Crack ေပးႏိုင္တဲ့ ေဆာ့၀ဲေလးပါ
IDM ကို ဗားရွင္းအသစ္ထြက္တိုင္း ေဒါင္းယူၿပီး Install လုပ္လိုက္ပါ
ၿပီးရင္ ဒီေဆာ့၀ဲေလးကို Run ၿပီး Start ဆိုတာကို ႏွိပ္ေပးလိုက္ရံုနဲ႔
အဲဒီ IDM ဗားရွင္းအသစ္ကို Full Version အျဖစ္ Crack ၿပီးသြားၿပီ ျဖစ္ပါတယ္

ကဲ .. လိုခ်င္တဲ့သူငယ္ခ်င္းမ်ား ေအာက္မွာ ေဒါင္းယူလိုက္ပါ


အဆင္ေျပၾကပါေစဗ်ာ

နည္းပညာလမ္းေၾကာင္းေပၚကသူငယ္ခ်င္းအားလံုးကို ေလးစားခင္မင္လွ်က္
အိုင္တီမုဆိုး


IDM Crack Tool


As you know that internet download manager is best download manager. Due to this every one wants this , many cracks and serials are released but some are fakes and some are viruses. Todya when i was busy in internet world i found this trick to crack IDM.

Needed :

1. Download any trial version of IDM.
2. Then download this tool named as IDM cracker

Procedure:

1. Now after you have downloaded it fire it up and make sure you have already installed latest version IDM on your PC, well if its not latest than you just need to click on Update in this tool and than go to your IDM and choose check for updates and update it too the latest version.

2. Now after you have updated it too the latest version you just need to crack it up so that its again full version and you can use it for as long as you wanted too.

3. So now just again go to IDM Cracker Tool and than click on Start and it will patch your IDM and now you will have a full working version of IDM.

Download the program from the below link.


Be enjoy! :)

Baca Selengkapnya ....

Google မွာရွာေဖြတဲ့အခါ ျမန္ျမန္ဆန္ဆန္ ထိထိေရာက္ေရာက္

Posted by Unknown Jumat, 28 Juni 2013 0 komentar

post-image

ကၽြန္ေတာ္တို႔ေတြဟာ အေၾကာင္းအရာတစ္ခုခု
ဒါမွမဟုတ္ ဖိုင္ေလး၊ ေဆာ့၀ဲေလးတစ္မ်ိဳမ်ိဳးကို
လိုခ်င္တဲ့အခါ Googling လုပ္ၾကရပါတယ္

အဲဒီလို google မွာ ကိုယ္လိုခ်င္တာကို
ေမႊေႏွာက္ရွာေဖြတဲ့အခါ Google Search Engine ဟာ
ကၽြန္ေတာ္တို႔ ႐ိုက္ထည့္ၿပီးရွာေဖြလိုက္တဲ့ စာလံုးေတြထဲက
Keyword ေတြကို ေရြးထုတ္ၿပီး အဲဒီ Keyword ေတြနဲ႔
တုိက္ဆိုင္တဲ့ စာလံုးေတြပါတဲ့ Post ေတြကို လိုက္လံရွာေဖြပါတယ္

အဲဒီလိုရွာေဖြတဲ့အခါမွာ Default အားျဖင့္ Website အသီးသီးရဲ႕
Post ေတြထဲက ပထမဆံုး စာလံုးေပါင္း ၁၀၀ အတြင္း အဲဒီ keyword ရွိေနမေနကို ရွာေဖြပါတယ္


အဲဒီေတာ့ အခ်ိဳ႕ေသာ SEO ႏိုင္နင္းတဲ့ Website ေတြဟာ ရွာေဖြတာအမ်ားဆံုးျဖစ္တဲ့ Keyword ေတြကို
(ဥပမာ - Free, Full Version, Crack , Patch , Keygen , Serial , Download, Hack , Earn Money စတဲ့ keyword ေတြကို
သူတုိ႔တင္လိုက္တဲ့ ပို႔စ္ေတြတိုင္းရဲ႕ ပထမဆံုး အလံုး ၁၀၀ အတြင္း ပါေအာင္ထည့္ေပးထာမ်ိဳး
ပို႔စ္ေခါင္းစဥ္တိုင္းမွာ အဲဒီ Keyword တစ္ခုမဟုတ္တစ္ခုကို ပါေအာင္ထည့္ေပးထာမ်ိဳး
Website ရဲ႕ Description မွာ ထည့္ေရးထားတာမ်ိဳးေတြကို လုပ္ေဆာင္ၿပီး အလည္လာသူမ်ားေအာင္
Page Rang တက္ေအာင္ စီစဥ္ထားေလ့ရွိပါတယ္
( ေနာင္အလ်ဥ္းသင့္တဲ့အခါမ်ိဳးမွာ အဲဒီအေၾကာင္းကို ပို႔စ္ေရးတင္ေပးပါဦးမယ္ )
အဲဒါေၾကာင့္လည္း ကိုယ္က စာလံုးအခ်ိဳ႕ကို ႐ိုက္ထည့္ၿပီးရွာလိုက္တဲ့အခါ ကိုယ္ရွာတဲ့စာလံုးေတာ့ ပါလာပါရဲ႕
အဲဒီ Website ကို ၀င္ၾကည့္လိုက္တဲ့အခါ ကိုယ္ရခ်င္တဲ့အရာနဲ႔ ဘာမွမဆိုင္တဲ့ Website ႀကီးျဖစ္ေနတာမ်ိဳးေတြ
မၾကာခဏႀကံဳရေလ့ရွိပါတယ္
အဲဒီေတာ့ မလိုအပ္ပဲ အခ်ိန္ၾကာသြားတာေတြ သတိလက္လြတ္နဲ႔ ဗိုင္းရပ္မိသြားတာမ်ိဳးေတြ စတဲ့ စိတ္ညစ္စရာကိစၥေတြ
ႀကံဳရေလ့ရွိေနတတ္ပါတယ္
ကဲ .. ဒီပို႔စ္ေလးမွာေတာ့ အဲဒီလို Googling လုပ္တဲ့အခါမွာ ျမန္ျမန္ဆန္ဆန္ထိထိေရာက္ေရာက္နဲ႔ ကိုယ္ရွာလိုက္တဲ့အတိုင္း
လြဲေခ်ာ္မႈအနည္းဆံုးနဲ႔ Result ထြက္လာေအာင္
Google ကလည္း ကိုရွာလိုက္တဲ့ Keyword ကို ရွာေဖြတဲ့အခါမွာ အျခားရွာေဖြသူေတြရဲ႕
ႏွစ္သက္မႈအမ်ားဆံုးျဖစ္တဲ့ Website ေတြကိုပဲ ေကာက္ႏုတ္ၿပီး ရွာေဖြေပးေအာင္ Browser မွာ Setting လုပ္ထားႏိုင္တဲ့နည္းေလးကို
မွ်ေ၀ေပးမွာ ျဖစ္ပါတယ္
Mozilla Firefox ကို သံုးၿပီး ရွင္းျပထားပါတယ္ အျခား Browser ေတြမွာလည္း ဒီနည္းကိုမွီးၿပီး Setting ထဲမွာ ရွာေဖြျပဳျပင္ထားႏိုင္ပါတယ္
အရင္ဆံုး Firefox ကို ဖြင့္ၿပီး ႀကိဳက္တဲ့စာလံုးတစ္လံုးကို ႐ိုက္ထည့္ၿပီး Google မွာ ရွာလိုက္ပါ
ရွာေဖြလိုက္တဲ့စာလံုးနဲ႔သက္ဆိုင္တဲ့ လင့္ေတြက်လာၿပီဆိုရင္ အဲဒီ Page ရဲ႕ ညာဖက္အေပၚေဒါင့္နားေလးက စက္သြားပံုေလးကိုႏွိပ္ၿပီး က်လာတဲ့ထဲက Search Settings ကိုတာကို
ႏွိပ္ေပးလိုက္ပါ ..


အဲဒီအခါ ေအာက္ပံုအတိုင္း ပြင့္လာပါမယ္


အဲဒီထဲက Never show Instant results ရဲ႕ေရွ႕မွာ အမွတ္ေလးေျပာင္းတပ္လိုက္ပါ
အဲဒီအခါ ေအာက္က Results per page မွာ 100 Slower ကေန 10 Faster ကို ေျပာင္းသြားတာ ေတြ႕ရပါလိမ့္မယ္
ၿပီးရင္ေတာ့ ေအာက္နားေလးက Save ကို ႏွိပ္ေပးလိုက္ပါ
ၿပီးရင္ Browser ကို ပိတ္လိုက္ပါ
ေနာက္တစ္ႀကိမ္း ကိုယ္ရွာခ်င္တာကို ရွာတဲ့အခါ အရင္ကထက္ ျမန္ဆန္သြက္လက္လာတဲ့အျပင္
အခ်က္အလက္ေတြလည္း ပိုၿပီးတိက်ထိေရာက္လာတာကို ေတြ႕ရပါလိမ့္မယ္
ကဲ .. အဆင္ေျပၾကပါေစဗ်ာ

နည္းပညာလမ္းေၾကာင္းေပၚကသူငယ္ခ်င္းအားလံုးကို ေလးစားခင္မင္လွ်က္
အိုင္တီမုဆိုး

Baca Selengkapnya ....

Tuneup Utlities 2013 Full Version

Posted by Unknown 0 komentar


ကၽြန္ေတာ့္ဘေလာ့ရဲ႕ Facebook Page မွာ
ေတာင္းထားတဲ့သူငယ္ခ်င္းေတြနဲ႔ အျခား အသံုးလိုတဲ့
သူငယ္ခ်င္းေတြအတြက္ Tuneup Utilities 2013 ေလး
တင္ေပးလိုက္ပါတယ္

Full Version အျဖစ္ အသံုးျပဳႏိုင္ဖို႔ Patch ဖိုင္ေလးပါ
ထည့္ေပးထားပါတယ္

Tuneup Utlities ဆိုတာကလည္း ကြန္ပ်ဴတာျမန္ဆန္သြက္လက္ေရးအတြက္
အေထာက္အကူျပဳေပးတဲ့ ေဆာ့၀ဲေလးတစ္ခုျဖစ္ၿပီး မသံုးဖူးသူမရွိသေလာက္ လူသိမ်ားတဲ့ေဆာ့၀ဲျဖစ္တဲ့အတြက္ အက်ယ္တ၀င့္ရွင္းျပေနစရာ
မလိုေတာ့ဘူးလို႔ ထင္ပါတယ္


ကဲ .. လိုခ်င္တဲ့သူငယ္ခ်င္းမ်ား ေအာက္မွာ ေဒါင္းယူႏိုင္ပါတယ္


Setup ဖိုင္ကို Install လုပ္ၿပီးတာနဲ႔ Patch ဆိုတဲ့ဖိုဒါထဲက ဖိုင္ကို Run လိုက္ပါ
ပြင့္လာတဲ့ထဲက Patch ဆိုတာကိုႏွိပ္ေပးလိုက္ပါ
အဲဒီအခါ နံမည္ထည့္ခိုင္းတဲ့ Box ေလးတက္လာပါမယ္
အဲဒီထဲမွာ ကိုယ္ႀကိဳက္တဲ့နံမည္ကိုထည့္ေပးၿပီး Ok ကို ႏွိပ္ေပးပါ
ေနာက္ထပ္ ကိုယ့္ရဲ႕ ကုမၸဏီနံမည္ထည့္ခိုင္းတဲ့ Box မွာလည္း ကိုယ္ႀကိဳက္တဲ့နံမည္ ထည့္ေပးၿပီး OK ကိုႏွိပ္ေပးလိုက္ပါ
အဲဒါေတြက လိုင္စင္ဗားရွင္းမွာ တြဲၿပီးေပၚေနမယ့္ အခ်က္ေတြပါ
ဒါဆိုရင္ေတာ့ အဆင္ေျပသြားပါၿပီ
တစ္ခ်ိဳ႕ကြန္ပ်ဴတာေတြေတာ့ လံုၿခံဳေရးစနစ္ေပၚမူတည္ၿပီး Patch ကို ႏွိပ္လိုက္တဲ့အခါ Patch လုပ္မယ့္ဖိုင္ကို မေတြ႕ေၾကာင္း
ဒါေၾကာင့္ အဲဒီဖိုင္ကို ကြန္ပ်ဴထဲမွာ လိုက္ရွာမလားဆိုတဲ့ Message Box ေလးတက္လာတတ္ပါတယ္
အဲဒီလို Message Box တက္လာရင္ Yes တို႔ OK တို႔ႏွိပ္ေပးလိုက္ပါ
ေနာက္ထပ္ပြင့္လာတဲ့ထဲကေန C >> Program Files >> Tunup Utlities ဆိုတဲ့ဖိုဒါထဲက
Tunup Utlities ဆိုတဲ့ Application ဖိုင္ေလးကိုေရြးေပးၿပီး Open တို႔ OK တို႔ ႏွိပ္ေပးလိုက္ပါ
အဲဒါၿပီးမွာ အေပၚမွာေျပာခဲ့တဲ့ နံမည္ထည့္ရတဲ့အဆင့္ကို ေရာက္သြားမွာျဖစ္ပါတယ္
အားလံုးၿပီးသြားၿပီဆိုရင္ေတာ့ Patching Done ဆုိတဲ့စာတမ္းေလးနဲ႔အတူ
Patch လုပ္တာ ေအာင္ျမင္သြားၿပီး Full Version အျဖစ္ အသံုးျပဳလို႔ရသြားပါၿပီ
ကဲ .. အဆင္ေျပၾကပါေစဗ်ာ

နည္းပညာလမ္းေၾကာင္းေပၚကသူငယ္ခ်င္းအားလံုးကို ေလးစားခင္မင္လွ်က္
အိုင္တီမုဆိုး

Baca Selengkapnya ....

Adobe ေဆာ့၀ဲတိုင္းအတြက္ Activator ေလး Adobe Tool Ultimate v3.6

Posted by Unknown 0 komentar

post-image


Adobe ေဆာ့၀ဲေတာ္ေတာ္မ်ားမ်ား ( အားလံုးနီးပါး) ကို Permanent လိုင္စင္ဗားရွင္းျဖစ္ေအာင္ လိုအပ္ေနတဲ့ Serial ေတြ ၀င္းဒိုးစနစ္ရဲ႕ Hosts ဖိုင္ထဲမွာ ျဖည့္သြင္းရမယ့္ Website IP ေတြကို ထည့္သြင္းေပးတာေတြလိုခ်င္တဲ့ Adobe ေဆာ့၀ဲေတြကို အလြယ္တကူ
Download ယူႏိုင္တာေတြအတြက္ ေတာ္ေတာ္ အံ့ၾသစရာေကာင္းတဲ့ ေဆာ့၀ဲေလးတစ္ခုလို႔ ေျပာရမွာပါ


Adobe နဲ႔ ပတ္သက္တဲ့ ေဆာ့၀ဲအားလံုးနီးပါးကို Full ဗားရွင္းျဖစ္ေအာင္
စနစ္တက် ေဆာင္ရြက္ေပးႏိုင္တဲ့အတြက္ အင္တာနက္နဲ႔ခ်ိတ္လိုက္မွ
Trail ဗားရွင္းျပန္ျဖစ္သြားတတ္တဲ့ ျပႆနာမ်ိဳးေတြ လံုး၀မျဖစ္ေအာင္ ေဆာင္ရြက္ေပးႏိုင္ပါတယ္
ဒီေဆာ့၀ဲထဲမွာ ေထာက္ပံ့ေပးထားတဲ့ Adobe Product ေတြကိုေတာ့ ေအာက္က အဂၤလိပ္မူမွာ ေလ့လာၾကည့္ႏိုင္ပါတယ္
လိုခ်င္တဲ့သူငယ္ခ်င္းမ်ား ေအာက္ကလင့္မွာ ေဒါင္းယူလိုက္ပါ


အဆင္ေျပပါေစဗ်ာ

နည္းပညာလမ္းေၾကာင္းေပၚကသူငယ္ခ်င္းအားလံုးကို ေလးစားခင္မင္လွ်က္
အိုင္တီမုဆိုး


Adobe Tool Ultimate v3.6 - Permanent Activator Adobe All Products CC

What's new

* Indicates remove option only.
? Indicates add option only.

Hosts Options:

Updated hosts patching for Adobe CC.

Serial Options:

Added to serials:

Adobe LeanPrint 1.
Adobe Lightroom 5.

Patch Options:

Added to patch:

Adobe Edge Animate CS6
Adobe After Effects CC
Adobe Audition CC
Adobe Captivate CC
Adobe Dreamweaver CC
Adobe Edge Animate CS6
Adobe Flash CC
Adobe Illustrator CC
Adobe InCopy CC
Adobe InDesign CC
Adobe Photoshop CC
Adobe Prelude CC
Adobe Premiere Pro CC
Adobe SpeedGrade CC

Cleaner:

Fixed permissions bug with deleting registry sub keys.

General:

Added F key functions:
F1 - Help
F11 - Maximize
F12 - Minimize

Fixed tooltip bug on buttons.

Options:

Toggled categories.

Added to Options:
Adobe Acrobat XI options

Patch:

Added to Patch:
Adobe Framemaker 11
Adobe InDesign CS6 Server
Adobe RoboHelp 10

Serials:

Added to Autoserials:
Adobe Framemaker 11 *
Adobe RoboHelp 10 *

What's supported

Adobe Application Options

Adobe Acrobat X
Adobe Acrobat XI
Adobe CS5 Online Services
Adobe CS5.5 Online Services
Adobe CS6 Online Services
Adobe Illustrator CS6 "try out" removal

Auto Serials

Adobe Acrobat X
Adobe Acrobat XI *
Adobe Acrobat X Suite
Adobe After Effects CS5.5
Adobe After Effects CS6 *
Adobe Audition CS5.5
Adobe Audition CS6 *
Adobe Captivate 5
Adobe Captivate 5.5
Adobe ColdFusion Builder 2
Adobe Contribute CS5
Adobe Contribute CS6 *
Adobe Creative Suite 5 Master Collection
Adobe Creative Suite 5 Production Premium
Adobe Creative Suite 5.5 Design Premium *
Adobe Creative Suite 5.5 Design Premium
Adobe Creative Suite 5.5 Master Collection
Adobe Creative Suite 5.5 Production Premium
Adobe Creative Suite 6 Design & Web Premium *
Adobe Creative Suite 6 Design Suite Standard *
Adobe Creative Suite 6 Master Colection *
Adobe Creative Suite 6 Production Premium *
Adobe CS5 32bit Support Pack
Adobe Director 11
Adobe Director 11.5
Adobe Dreamweaver CS5
Adobe Dreamweaver CS5.5
Adobe Dreamweaver CS6 *
Adobe Elearning Suite 2
Adobe Encore CS6 *
Adobe Fireworks CS5
Adobe Fireworks CS5.1
Adobe Fireworks CS6 *
Adobe Flash Builder 4
Adobe Flash Builder 4.5
Adobe Flash Builder 4.6
Adobe Flash Builder 4.6 for PHP
Adobe Flash Builder Plugin 4
Adobe Flash Catalyst CS5
Adobe Flash Catalyst CS5.5
Adobe Flash CS5
Adobe Flash CS5.5
Adobe Flash CS6 *
Adobe FrameMaker Server 10
Adobe Illustrator CS5
Adobe Illustrator CS5.1
Adobe Illustrator CS6 *
Adobe InCopy CS5
Adobe InCopy CS5.5
Adobe InCopy CS6 *
Adobe InDesign CS5
Adobe InDesign CS5.5
Adobe InDesign CS6 *
Adobe InDesign Server CS5
Adobe InDesign Server CS5.5
Adobe InDesign Server CS6 *
Adobe Media Encoder CS6 *
Adobe Photoshop CS5 Extended
Adobe Photoshop CS5.1 Extended
Adobe Photoshop CS6 Extended *
Adobe Photoshop Elements 11
Adobe Photoshop Elements 10
Adobe Photoshop Elements 9
Adobe Prelude CS6 *
Adobe Premiere Elements 11
Adobe Premiere Elements 10
Adobe Premiere Elements 9
Adobe Premiere Pro CS5
Adobe Premiere Pro CS5.5
Adobe Premiere Pro CS6
Adobe Robohelp 9
Adobe RoboHelp 10 *
Adobe Robohelp Server 9
Adobe Soundbooth CS5
Adobe SpeedGrade CS6 *
Adobe Techincal Communications Suite 3.5

* Indicates remove serial option only

Cleaner

Adobe Acrobat Cache
Adobe Acrobat Reader Setup Files
Adobe Acrobat Updater Logs
Adobe Acrobat X Set-up Files
Adobe Acrobat XI Set-up Files
Adobe Bridge CS5 Cache
Adobe Camera Raw Cache
Adobe CS5 Service Manager
Adobe CS5.5 Service Manager
Adobe CS6 Service Manager
Adobe Customization Wizard 8
Adobe Customization Wizard 9
Adobe Customization Wizard X
Adobe Customization Wizard XI
Adobe Dreamweaver Media List
Adobe Flash Install Logs
Adobe Flash Player Asset Cache
Adobe Media Cache
Adobe My Digital Editions Import Logs
Adobe Photoshop CS5 History
Adobe Photoshop CS5.5 History
Adobe Photoshop CS6 History
Adobe Reader X Setup Files
Adobe Updater Logs

Patch

Adobe Acrobat 9
Adobe Acrobat X
Adobe Acrobat XI
Adobe After Effects CS4
Adobe After Effects CS5
Adobe After Effects CS5.5
Adobe After Effects CS6
Adobe Audition CS5.5
Adobe Audition CS6
Adobe Bridge CS4
Adobe Bridge CS5
Adobe Bridge CS5.1
Adobe Bridge CS6
Adobe Captivate 5
Adobe Captivate 5.5
Adobe Captivate 6
Adobe Captivate CS4
Adobe Contribute CS4
Adobe Contribute CS5
Adobe Contribute CS5.1
Adobe Device Central CS4
Adobe Device Central CS5
Adobe Device Central CS5.5
Adobe Director 11
Adobe Director 11.5
Adobe Dreamweaver CS4
Adobe Dreamweaver CS5
Adobe Dreamweaver CS5.5
Adobe Dreamweaver CS6
Adobe Encore CS4
Adobe Encore CS5
Adobe Encore CS5.1
Adobe Encore CS6
Adobe Extension Manager CS4
Adobe Extension Manager CS5
Adobe Extension Manager CS5.5
Adobe Extension Manager CS6
Adobe Fireworks CS4
Adobe Fireworks CS5
Adobe Fireworks CS5.1
Adobe Fireworks CS6
Adobe Flash Catalyst CS5
Adobe Flash Catalyst CS5.5
Adobe Flash CS4
Adobe Flash CS5
Adobe Flash CS5.5
Adobe Flash CS6
Adobe Frame Maker 10
Adobe Frame Maker 9
Adobe Frame Maker Server 10
Adobe Frame Maker Server 9
Adobe Illustrator CS4
Adobe Illustrator CS5
Adobe Illustrator CS5.1
Adobe Illustrator CS6
Adobe Incopy CS4
Adobe Incopy CS5
Adobe Incopy CS5.5
Adobe Incopy CS6
Adobe InDesign CS4
Adobe InDesign CS5
Adobe Indesign CS5.5
Adobe Indesign CS6
Adobe InDesign CS6 Server
Adobe Media Encoder CS4
Adobe Media Encoder CS5
Adobe Media Encoder CS5.5
Adobe Media Encoder CS6
Adobe OnLocation CS4
Adobe OnLocation CS5
Adobe OnLocation CS5.1
Adobe Photoshop CS4
Adobe Photoshop CS5
Adobe Photoshop CS5.1v Adobe Photoshop CS6
Adobe Photoshop Elements 10
Adobe Photoshop Elements 8v Adobe Photoshop Elements 9
Adobe Prelude CS6
Adobe Premiere Elements 10
Adobe Premiere Elements 8
Adobe Premiere Elements 9
Adobe Premiere Pro CS4
Adobe Premiere Pro CS5
Adobe Premiere Pro CS5.5
Adobe Premiere Pro CS6
Adobe RoboHelp 8
Adobe RoboHelp 9
Adobe RoboHelp 10
Adobe RoboHelp Server 8
Adobe Robohelp Server 9
Adobe Soundbooth CS4
Adobe Soundbooth CS5
Adobe SpeedGrade CS6

Serials

Adobe Acrobat 9
Adobe Acrobat X
Adobe Acrobat X Suite
Adobe After Effects CS4
Adobe After Effects CS5.5
Adobe Audition 3
Adobe Audition CS5.5
Adobe Captivate 4
Adobe Captivate 5
Adobe Captivate 5.5
Adobe ColdFusion Builder 1
Adobe ColdFusion Builder 2
Adobe ColdFusion Enterprise 8
Adobe ColdFusion Enterprise 9
Adobe Contribute CS4
Adobe Contribute CS5
Adobe Creative Suite 4 Design Premium
Adobe Creative Suite 4 Master Collection
Adobe Creative Suite 4 Production Premium
Adobe Creative Suite 4 Web Premium
Adobe Creative Suite 5 Master Collection
Adobe Creative Suite 5 Production Premium
Adobe Creative Suite 5.5 Design Premium
Adobe Creative Suite 5.5 Master Collection
Adobe Creative Suite 5.5 Production Premium
Adobe Creative Suite 6 Master Collection
Adobe Director 11
Adobe Director 11.5
Adobe Dreamweaver CS4
Adobe Dreamweaver CS5
Adobe Dreamweaver CS5.5
Adobe Elearning Suite 1
Adobe Elearning Suite 2
Adobe Fireworks CS4
Adobe Fireworks CS5
Adobe Fireworks CS5.1
Adobe Flash Builder 4
Adobe Flash Builder 4.5
Adobe Flash Builder 4.5 PHP
Adobe Flash Builder 4.6
Adobe Flash Builder 4.6 PHP
Adobe Flash Builder Plugin 4
Adobe Flash Catalyst CS5
Adobe Flash Catalyst CS5.5
Adobe Flash CS4
Adobe Flash CS5
Adobe Flash CS5.5
Adobe Flash Media Enterprise Server 4
Adobe Flash Media Interactive Server 3.5
Adobe Flash Media Interactive Server 4
Adobe Flash Media Streaming Server 3.5
Adobe Flash Media Streaming Server 4
Adobe FlexBuilder 3
Adobe FrameMaker 10
Adobe FrameMaker 9
Adobe FrameMaker Server 10
Adobe FrameMaker Server 8
Adobe FrameMaker Server 9
Adobe Illustrator CS4
Adobe Illustrator CS5
Adobe Illustrator CS5.1
Adobe InCopy CS4
Adobe InCopy CS5
Adobe InCopy CS5.5
Adobe InDesign CS4
Adobe InDesign CS5
Adobe InDesign CS5.5
Adobe InDesign Server CS4
Adobe InDesign Server CS5
Adobe InDesign Server CS5.5
Adobe LiveCycle Data Services ES 2
Adobe LiveCycle Data Services ES2 3
Adobe LiveCycle Designer ES2 9
Adobe Photoshop CS4 Extended
Adobe Photoshop CS5 Extended
Adobe Photoshop CS5.1 Extended
Adobe Photoshop Elements 11
Adobe Photoshop Elements 10
Adobe Photoshop Elements 9
Adobe Photoshop Lightroom 3
Adobe Photoshop Lightroom 4
Adobe Premiere Elements 11
Adobe Premiere Elements 10
Adobe Premiere Elements 9
Adobe Premiere Pro CS4
Adobe Premiere Pro CS5
Adobe Premiere Pro CS5.5
Adobe Presenter 7
Adobe RoboHelp 8
Adobe RoboHelp 9
Adobe RoboHelp Server 8
Adobe RoboHelp Server 9
Adobe Soundbooth CS4
Adobe Soundbooth CS5
Adobe Technical Communication Suite 2
Adobe Technical Communication Suite 3.5
Adobe Visual Comunicator 3
Color Finesse 3 LE
Color Finesse 3 PL

Use the given Adobe Tool to activate
Done, Enjoy.
Download the program from the link below.


Be enjoy! :)

Baca Selengkapnya ....

USB Disk Security 6.3.0.30 Full Version

Posted by Unknown Kamis, 27 Juni 2013 0 komentar


ကြန္ပ်ဴတာထဲကို ဗိုင္းရပ္၀င္ေရာက္ေစႏိုင္တဲ့
အဓိကလမ္းေၾကာင္းေတြထဲက တစ္ခုအပါအ၀င္ျဖစ္တဲ့
USB ေပါက္မွာ တပ္ဆင္လိုက္တဲ့ Flash Drive ေတြမွာ
ဗိုင္းရပ္ကင္းစင္ျခင္းရွိမရွိ စစ္ေဆးေပးၿပီး
ေတြ႕ရွိလာတဲ့ဗိုင္းရပ္ကိုလည္း ႏိုင္ႏိုင္နင္းနဲ႔ ဖယ္ရွားရွင္းလင္းေပးမယ့္
ေဆာ့၀ဲေလးတစ္မ်ိဳးျဖစ္ပါတယ္

ကြန္ပ်ဴတာသံုးသူတိုင္းနီးပါးနဲ႔ ရင္းႏွီးၿပီးသား ေဆာ့၀ဲေလးျဖစ္တဲ့အတြက္
သိပ္အက်ယ္ခ်ဲ႕ၿပီး မေျပာေတာ့ပါဘူး ..


လိုခ်င္တဲ့သူငယ္ခ်င္းမ်ား ေအာက္မွာ ေဒါင္းယူႏိုင္ပါတယ္
Full Version အျဖစ္သံုးႏိုင္ေအာင္ keygen ဖိုင္ပါထည့္ေပးထားပါမယ္


ကဲ .. အဆင္ေျပပါေစဗ်ာ
နည္းပညာလမ္းေၾကာင္းေပၚကသူငယ္ခ်င္းအားလံုုးကို ေလးစားခင္မင္လွ်က္
အိုင္တီမုဆိုး


 USB Disk Security 6.3.0.30 Full Version

USB Disk Security provides 100% protection against any threats via USB drive, however, the majority of other products are unable even to guarantee 90% protection. USB Disk Security is the best antivirus software to permanently protect offline computer without the need for signature updates, but other antivirus software should update signature database regularly, and they cannot effectively protect offline computer. This light and easy to use solution is 100% compatible with all software and doesnt slow down your computer at all. You pay USB Disk Security once and get it all, however, other antivirus products should be paid for updates every year.

Product Highlights:

100% protection against any malicious programs via USB storage
USB Disk Security uses innovative proactive technology to block any threats via USB drive. There are relatively few products available in shops or on the Internet which offer even close to 100% protection against any malicious programs via USB drive. The majority of products are unable even to guarantee 90% protection. USB Disk Security is the worlds best software to block threats via USB drive.

The best solution to protect offline computer
Other antivirus software should update signature database regularly, and they cannot effectively protect offline computer that is not connected to the Internet. When new viruses, worms and other malicious attacks strike, traditional signatures are insufficient. Every minute one waits for a virus signature update creates a window of vulnerability that could have devastating consequences. USB Disk Security uses advanced proactive detection techniques, requires no signature updates, and closes the window of vulnerability left open by other reactive, signature-based responses.

The worlds fastest and smallest antivirus software
With USB Disk Security, it’s not necessary to sacrifice speed for detection and scanning. Compare antivirus software and youll discover that USB Disk Security is by far one of the smallest applications in the industry. For example, the v5.0 of USB Disk Security installer is just 1 MB. The program utilizes approximately 1 to 7 MB of RAM.

100% compatible with all software
Incompatibility between antivirus programs is an issue. In the vast majority of cases, installing two antivirus programs from different vendors on one machine (for increased protection) is technically impossible, as the two programs will disrupt each others functioning. However, USB Disk Security is 100% compatible with all software, including Windows Vista.

Simple to use
USB Disk Security has been specifically designed to perform effectively regardless of the users level of computer expertise. Just install and forget it.
Download the program from the below link.


Be enjoy! :)

Baca Selengkapnya ....

လန္းခ်က္က ၉ ေက်ာ္မလားပဲ IObit Malware Fighter Pro V 2.0

Posted by Unknown Rabu, 26 Juni 2013 0 komentar

post-image

IObit Maleware Fighter ဆိုတဲ့ေဆာ့၀ဲေလးဟာ
Antivirus ေလာကမွာ ေတာ္ေတာ္ေလး နံမည္ႀကီးတဲ့
ေဆာ့၀ဲေကာင္းေလးတစ္မ်ိဳးျဖစ္ပါတယ္

maleware ေတြကိုတင္မဟုတ္ပဲ ဗိုင္းရပ္ေတာ္ေတာ္မ်ားမ်ားကိုေတာင္
ဖယ္ရွားကာကြယ္ေပးႏိုင္တဲ့ သူ႕ရဲ႕ အစြမ္းေၾကာင့္ပါ

ေနာက္ၿပီး Cracked ဗားရွင္းလည္း ရဖို႔ခက္တာေၾကာင့္ နံမည္ႀကီးေပမယ့္ ပိုက္ပိုက္ေပးၿပီးသံုးၾကရတာက မ်ားပါတယ္


ကဲ .. အခုေတာ့ IObit Maleware Fighter Pro v 2.0 ကို keygen နဲ႔အတူ တင္ေပးလိုက္ပါတယ္

အရင္ဆံုး Free Version ကို သူ႕ရဲ႕မူရင္း၀က္ဆိုဒ္ျဖစ္တဲ့ ဒီေနရာ မွာ ေဒါင္းယူၿပီး Install လုပ္ႏိုင္ပါတယ္

အလုပ္အ႐ႈပ္မခံခ်င္တဲ့သူငယ္ခ်င္းေတြအတြက္ေတာ့ အဲဒီ၀က္ဆိုဒ္ကေနပဲ ေဒါင္းယူထားတဲ့ Free Version
ကို ကၽြန္ေတာ္တင္ေပးထားပါတယ္
အဲဒါကိုပဲေဒါင္းခ်င္တယ္ဆိုရင္ေတာ့ ေအာက္မွာ ေဒါင္းယူလိုက္ပါ


ဘယ္ေနရာပဲ ေဒါင္းေဒါင္း Full Version ျဖစ္ဖို႔အတြက္ လိုအပ္တဲ့ keygen ဖိုင္ကို ေအာက္မွာ ေဒါင္းယူပါ


Download ယူနည္းကို
ဘေလာ့ရဲ႕ေအာက္ဆံုးမွာ
Slide Show နဲ႔ ျပထားပါတယ္


ၿပီးရင္ ေဆာ့၀ဲကို အရင္ Install လုပ္ပါ

ၿပီးရင္ ကီးမထည့္ခင္ အင္တာနက္ကြန္နက္ရွင္ကို ပိတ္လိုက္ပါ


keygen ဖိုင္ကို Run ၿပီး Generate ကိုႏွိပ္ပါ
ေပၚလာတဲ့ ကီးကို ေကာ္ပီကူးယူလိုက္ပါ
ၿပီးရင္ IObit Maleware Fighter ကို Run ပါ
ေအာက္ကပံုအတိုင္း ပြင့္လာပါမယ္


အဲဒီထဲက Upgrade ကိုႏွိပ္ပါ
ေအာက္ကပံုအတိုင္း ပြင့္လာပါမယ္


အဲဒီထဲက Enter License ကိုႏွိပ္ပါ
ေအာက္ကပံုအတိုင္း ပြင့္လာပါမယ္


အဲဒီထဲက ကီးထည့္ရမယ့္ အကြက္မွာ ကူးယူထားတဲ့ ကီးကိုထည့္ေပးၿပီး Activate ကိုႏွိပ္လိုက္ပါ
ပထမဆံုးကီးကိုထည့္တဲ့အခါ Invalid key လို႔ ျပတတ္ပါတယ္ ( အဲဒါက ပိုက္ပိုက္ေပးၿပီး၀ယ္သံုးထားတဲ့သူရဲ႕ကီးပါ .. အဲဒီကီးေပၚမွာမူတည္ၿပီး Crack ထားတာေၾကာင့္ အဲဒီကီးက သံုးၿပီးသားကီးျဖစ္ေနတတ္တာပါ .. )
အဲဒီလို ျဖစ္တယ္ဆိုရင္ keygen ဖိုင္ထဲက Generate ကို ထပ္ႏွိပ္ပါ
ဒုတိယကီးကစၿပီး အဆင္ေျပသြားပါလိမ့္မယ္
အဲဒီလို သူလက္ခံတဲ့ကီးထည့္ၿပီး Activate ကိုႏွိပ္လိုက္တဲ့အခါ အင္တာနက္ခ်ိတ္မထားတဲ့အတြက္ Error Box တစ္ခုတက္လာပါမယ္
အဲဒါေတြကို ပိတ္လိုက္ပါ Program ကိုလည္း ပိတ္လိုက္ပါ
အင္တာနက္ကို ျပန္ခ်ိတ္လိုက္ပါ
Program ကို ျပန္ Run လုိက္ပါ
အရင္က အေပၚဆံုးမွာ Free လို႔ျပေနတဲ့ေနရာမွာ Pro လို႔ျပေနတာကို ေတြ႕ရပါလိမ့္မယ္
ဒါဆိုရင္ေတာ့ Full Version ျဖစ္သြားပါၿပီ


အဲဒီထဲက အနီေရာင္ျဖစ္ေနတဲ့ Update ဆိုတာကိုႏွိပ္ၿပီး
Database ေတြကို Chech လုပ္ႏိုင္ပါတယ္
Date Out ေနတဲ့ Database ကို ပုံမွန္ Download ယူၿပီး Install လုပ္ေပးလိုက္ရင္ ေနာက္ဆံုးထြက္ ဗိုင္းရပ္ကုဒ္ေတြရဲ႕ Database ေတြကို ရရွိလာမွာျဖစ္ပါတယ္


အဲ .. အဲဒီလို Update လုပ္ၿပီးရင္ Pro ေနရာမွာ Free ဆိုၿပီး ျပန္ျဖစ္သြားတတ္ပါတယ္
အဲဒါဆိုရင္ေတာ့ အရင္ကီးထည့္တုန္းကလိုပဲ အင္တာနက္ကိုပိတ္ၿပီး ကီးထည့္ Activate ကိုႏွိပ္
အဲဒီလို ျပန္ျပန္လုပ္ေပးရပါမယ္
ေအာက္ကကီးကေတာ့ သူငယ္ခ်င္းတစ္ေယာက္ ပိုက္ပိုက္ေပး၀ယ္ၿပီး လက္ေဆာင္ေပးထားတဲ့ကီးမို႔
အင္တာနက္မပိတ္ပဲ ထည့္လို႔ရတဲ့ကီးအျဖစ္ ပို႔စ္ကို ဆံုးေအာင္ဖတ္တဲ့သူငယ္ခ်င္းေတြအတြက္
လက္ေဆာင္ေပးလိုက္ပါတယ္ .... :D

AE9C1-08313-45C7D-F0BA1

Update ေတာ့ တစ္ပါတ္တစ္ခါေလာက္လုပ္ေပးပါ
ဒါမွ ဗိုင္းရပ္ကုဒ္အသစ္ေတြကို သိရွိကာကြယ္ဖယ္ရွားႏိုင္မွာပါ
ကြန္ပ်ဴတာမွာ ဗိုင္းရပ္ကင္းစင္ေနမွာ ျဖစ္ပါတယ္
ကဲ .. အဆင္ေျပပါေစဗ်ာ

နည္းပညာလမ္းေၾကာင္းေပၚကသူငယ္ခ်င္းအားလံုုးကို ေလးစားခင္မင္လွ်က္
အိုင္တီမုဆိုး

Baca Selengkapnya ....

CCleaner Professional Edition v4.03.4151

Posted by Unknown Selasa, 25 Juni 2013 0 komentar

post-image

CCleaner Professional ဗားရွင္းေလး ရလာလို႔ တင္ေပးလိုက္ပါတယ္

Ccleaner ဆိုတာကလည္း ကြန္ပ်ဴတာသံုးသူတိုင္းနီးပါး
သိထားၿပီးသား ေဆာ့၀ဲတစ္မ်ိဳးျဖစ္ပါတယ္

Free ဗားရွင္းမွာတင္ပဲ ေတာ္ေတာ္ေလး အသံုး၀င္တဲ့ ေဆာ့၀ဲေလးျဖစ္ပါတယ္

အခုတင္ေပးလိုက္တာကေတာ့ Full ဗားရွင္းအျဖစ္ အသံုးျပဳႏိုင္မယ့္
ေဆာ့၀ဲျဖစ္ပါတယ္


လိုခ်င္တဲ့သူငယ္ခ်င္းမ်ား ေအာက္မွာ ေဒါင္းယူႏိုင္ပါတယ္


အထဲမွာ Install လုပ္ပံု Register လုပ္ပံုကို notepad ေလးနဲ႔ ေရးထည့္ေပးထားပါတယ္
ကဲ .. အဆင္ေျပပါေစဗ်ာ

နည္းပညာလမ္းေၾကာင္းေပၚကသူငယ္ခ်င္းအားလံုုးကို ေလးစားခင္မင္လွ်က္
အိုင္တီမုဆိုး


 CCleaner Professional Edition v4.03.4151

CCleaner Professional Edition is the number-one tool for cleaning your Windows PC. It protects your privacy online and makes your computer faster and more secure. CCleaner is easy to use and a small, fast download and user interface has the modern look. CCleaner is a freeware system optimization and privacy tool. Removes unused files from your system – allowing Windows to run faster and freeing up valuable hard disk space. It also cleans traces of your online activities such as your Internet history. CCleaner can run from a USB thumbdrive and be installed/run on a computer without a complicated setup process. It is possible to specify files, folders and registry keys to ignore from the cleaning process. But the best part is that it’s fast (normally taking less than a second to run) and contains NO Spyware or Adware!

Cleans all areas of your Computer

    Internet Explorer
    Temporary files, history, cookies, Autocomplete form history, index.dat.
    Firefox
    Temporary files, history, cookies, download history, form history.
    Google Chrome
    Temporary files, history, cookies, download history, form history.
    Opera
    Temporary files, history, cookies.
    Safari
    Temporary files, history, cookies, form history.
    Windows
    Recycle Bin, Recent Documents, Temporary files and Log files.
    Registry Cleaner
    Advanced features to remove unused and old registry entries.

v4.03.4151 (25 Jun 2013)
Changes:

    Added command line option to reboot after cleaning (/AUTO /RESTART).
    Improved Firefox cleaning: Site Preferences, History and Startup items.
    Improved Internet Explorer 10 cleaning: Saved Passwords, Userdata Cookies and Last Download Location.
    Improved Internet Explorer 9 Last Download Location cleaning.
    Improved Opera Cache cleaning.
    Updated Startup items detection for Firefox and Google Chrome.
    Added Cookie management for multiple users (Pro Version).
    Improved Startup item management for multiple users on Windows 8 (Pro Version).
    Added cleaning for Express Scribe, Gom Player, Skype Metro App, Twitter Metro and Adobe Reader Touch.
    Improved cleaning for Microsoft Office 2013.
    Added Thai translation.
    Improved localization and language support.

System Requirements:

    Runs on Microsoft Windows 8, 7, Vista and XP - both 32-bit and 64-bit editions.

Download the program from the link below


How to Install

    Disable your Internet at first
    Run "ccsetup403.exe"
    After installation, Don't run the program.
    Copy "branding.dll" from Crack folder to Pest"C:\Program Files\CCleaner"
    Run CCleaner
    Enter Serial Key for Registration
    Enjoy.

Baca Selengkapnya ....

Mozilla Firefox 22.0

Posted by Unknown 0 komentar
post-image

Mozilla Firefox Browser ေနာက္ဆံုးဗားရွင္းေလး
ထြက္လာလို႔ အလြယ္တကူေဒါင္းႏိုင္ေအာင္
ျပန္တင္ေပးလိုက္ပါတယ္


အရင္ရွိထားၿပီးသား ဗားရွင္းကို Uninstall လုပ္စရာမလိုပဲ
သာမာန္အတိုင္း Install လုပ္လိုက္႐ံုနဲ႔ သူ႕အလိုလို
Upgrade လုပ္ၿပီး Install လုပ္သြားမွာျဖစ္ပါတယ္
လိုခ်င္တဲ့သူငယ္ခ်င္းမ်ား ေအာက္မွာ ေဒါင္းယူႏိုင္ပါတယ္


Download ယူနည္းမသိရင္
ဘေလာ့ရဲ႕ေအာက္ဆံုးမွာ
Slide Show နဲ႔ ျပထားပါတယ္

ကဲ .. အဆင္ေျပပါေစဗ်ာ

နည္းပညာလမ္းေၾကာင္းေပၚကသူငယ္ခ်င္းအားလံုုးကို ေလးစားခင္မင္လွ်က္
အိုင္တီမုဆိုး

Baca Selengkapnya ....

Windows Media Player ရဲ႕ လက္တြဲေဖာ္ေလး K-lite Codec Pack

Posted by Unknown 0 komentar


တစ္ကယ္ပဲ Windows Media Player ရဲ႕ လိုအပ္ခ်က္ေတြကို
ကူညီျဖည့္ဆည္းေပးႏိုင္သလို သူကိုယ္တိုင္လည္း Player
တစ္ခုအျဖစ္ Video နဲ႔ Audio ဖိုင္ပံုစံ Format အားလံုးနီးပါးကို
ဖြင့္ေပးႏိုင္တဲ့ ေဆာ့၀ဲေလးတစ္ခုျဖစ္ပါတယ္

ကၽြန္ေတာ္တို႔ေတြရဲ႕ ၀င္းဒိုးမွာ Built In ပါလာတဲ့
Window Media Player ဟာ ၀င္းဒိုးေတာ္ေတာ္မ်ားမ်ားမွာ
Error မကင္းပဲ သံုးမရသလုိ ျဖစ္ေနေလ့ရွိပါတယ္

ဒီျပႆနာကို ေျဖရွင္းတဲ့နည္းကို ဒီပို႔စ္ မွာ တင္ေပးထားပါတယ္
ဒါေပမယ့္ အဲဒီနည္းနဲ႔ေျဖရွင္းလိုက္ေပမယ့္ အခ်ိဳ႕ေသာ ၀င္းဒိုးေတြမွာေတာ့
ေနာက္တစ္ႀကိမ္ ၀င္းဒိုးကို ျပန္ဖြင့္တဲ့အခါ Error ျပန္တက္သြားၿပီး
ေနာက္တစ္ႀကိမ္ အဲဒီနည္းအတိုင္း ျပန္ျပင္ေပးေနရတာမ်ိဳးေတြ ႀကံဳရတတ္ျပန္ပါတယ္


ဒါေပမယ့္ .. အခုတင္ေပးတဲ့ ေဆာ့၀ဲကို Install လုပ္ထားလိုက္ရင္ေတာ့
Windows Media Player ထဲက Error ျဖစ္ေနတဲ့အပိုင္းေတြကို Decoding လုပ္ေပးျခင္းအားျဖင့္
Windows Media Player နဲ႔ ဖိုင္ေတြကို ဖြင့္ႏိုင္သလို Windows Media Player မွာ Support မလုပ္လို႔
မဖြင့္ႏိုင္တဲ့ဖိုင္ေတြကိုလည္း Right Click ႏွိပ္ၿပီး Open with ဆိုၿပီး media player classic ကေန ဖြင့္ႏိုင္ပါတယ္
ဒါေၾကာင့္ သူငယ္ခ်င္းတို႔ရဲ႕ကြန္ပ်ဴတာထဲမွာ အျခားေသာ Player ေတြ မရွိထားရင္ပဲျဖစ္ျဖစ္ Window Media Player က ခဏခဏ Error တက္ေနရင္ပဲျဖစ္ျဖစ္ အျခာေသာ Player ေတြမွာ ႐ုပ္ထြက္အဆင္မေျပတာ အသံထြက္မျပတ္သားတာမ်ိဳးေတြ ျဖစ္ေနရင္ပဲျဖစ္ျဖစ္
ဗီဒီယိုဖိုင္ေတြ အသံဖိုင္ေတြ အားလံုးနီးပါးကို အဆင္ေျပေျပဖြင့္ႏိုင္တဲ့ Player ေကာင္းတစ္ခုကို
Install လုပ္ထားခ်င္တယ္ဆိုရင္ျဖစ္ျဖစ္ ဒီေဆာ့၀ဲေလးကို Install လုပ္ထားလိုက္ပါလို႔ အႀကံေပးခ်င္ပါတယ္
ကၽြန္ေတာ္ကိုယ္တိုင္လည္း ကၽြန္ေတာ့္ရဲ႕၀င္းဒိုးထဲမွာ Window Media Player နဲ႔ အခု Player ႏွစ္မ်ိဳးတည္းကိုပဲ Install လုပ္ၿပီး အသံုးျပဳေနတာျဖစ္ပါတယ္
Player အခ်ိဳ႕မွာျဖစ္တတ္တဲ့  ၀င္းဒိုးအခ်ိဳ႕ကို Support မလုပ္တဲ့ျပႆနာမ်ိဳး ဒီ Player မွာမရွိပါဘူး
ကၽြန္ေတာ္စမ္းသံုးၾကည့္ဖူးသေလာက္ေတာ့ Windows xp ကေန Windows 8 အထိ 32bit .. 64bit မေရြး အဆင္ေျပတဲ့ Player ေလးတစ္ခုပဲျဖစ္ပါတယ္
ကဲ .. လိုခ်င္တဲ့သူငယ္ခ်င္းမ်ား ေအာက္မွာ ေဒါင္းယူႏိုင္ပါတယ္


ေဒါင္းလို႔ Install လုပ္တဲ့အခါမွာ ေအာက္ကပံုကို ေရာက္ရင္ေတာ့ ပံုထဲမွာျပထားတဲ့အတိုင္း အမွန္ျခစ္ေလး ေျပာင္းတပ္ေပးပါ


အဲဒီလို လုပ္ေပးလိုက္မွ ေဆာ့၀ဲနဲ႔အတူပါလာတဲ့ Search Bar ေတြ ကၽြန္ေတာ္တို႔ရဲ႕ Browser ေတြမွာ ခိုးေၾကာင္ခိုး၀ွက္ မကပ္ႏိုင္မွာ ျဖစ္ပါတယ္
ကဲ .. အဆင္ေျပပါေစဗ်ာ

နည္းပညာလမ္းေၾကာင္းေပၚကသူငယ္ခ်င္းအားလံုုးကို ေလးစားခင္မင္လွ်က္
အိုင္တီမုဆိုး

Baca Selengkapnya ....

mp3 သီခ်င္းေတြကို ေနာက္ခံပံုထည့္လို႔တဲ့ MP3 Tag 2.56

Posted by Unknown 0 komentar


MP3 Tag ဆိုတဲ့ေဆာ့၀ဲေလး ဗားရွင္းအသစ္ထြက္လာလို႔
တင္ေပးလိုက္ပါတယ္

mp3 သီခ်င္းေတြမွာ ေနာက္ခံပံုေလးေတြ ထည့္လို႔ရေအာင္ ကူညီေပးတဲ့ ေဆာ့၀ဲေလးပါ

အသံုးျပဳနည္းကိုေတာ့ ဒီပို႔စ္ မွာ သြားၿပီး ဖတ္ႏိုင္ပါတယ္

ဗားရွင္းအေဟာင္းကို Install လုပ္ထားၿပီးသားျဖစ္ေနရင္လည္း ျပႆနာမရွိပါဘူး ..

Upgrade လုပ္ၿပီး လိုတာေတြ Install လုပ္ေပးသြားမွာ ျဖစ္ပါတယ္


ကဲ .. လိုခ်င္တဲ့သူငယ္ခ်င္းမ်ား ေအာက္မွ ေဒါင္းယူႏိုင္ပါတယ္


အဆင္ေျပပါေစဗ်ာ

နည္းပညာလမ္းေၾကာင္းေပၚကသူငယ္ခ်င္းအားလံုးကို ေလးစားခင္မင္လွ်က္
အိုင္တီမုဆိုး


MP3 Tag 2.56


Mp3tag is a powerful and yet easy-to-use tool to edit metadata (ID3, Vorbis Comments and APE) of common audio formats. It can rename files based on the tag information, replace characters or words from tags and filenames, import/export tag information, create playlists and more. The program supports online freedb database lookups for selected files, allowing you to automatically gather proper tag information for select files or CDs.

Mp3tag supports the following audio formats:

• Advanced Audio Coding (aac)
• Free Lossless Audio Codec (flac)
• Monkey's Audio (ape)
• Mpeg Layer 3 (mp3)
• MPEG-4 (mp4 / m4a / m4b / iTunes compatible)
• Musepack (mpc)
• Ogg Vorbis (ogg)
• OptimFROG (ofr)
• OptimFROG DualStream (ofs)
• Speex (spx)
• Tom's Audio Kompressor (tak)
• True Audio (tta)
• Windows Media Audio (wma)
• WavPack (wv)

What's new in this version:

• [2013-06-22] CHG: updated Danish, French, Hebrew, Russian, Slovenian and Turkish translations.
• [2013-06-21] CHG: updated TAK library to TAK 2.3.0.
• [2013-06-21] FIX: Performing update check occasionally resulted in runtime error.
• [2013-06-09] FIX: Changing option to show only user-defined genres had no effect until restarting Mp3tag.
• [2013-06-09] FIX: Undo after removing first file from list had no effect.
• [2013-06-08] LNG: Lithuanian language file.
Download the program from the link below.


Be enjoy! :)

Baca Selengkapnya ....

Windows 8 Start Menu And Start Button

Posted by Unknown Senin, 24 Juni 2013 0 komentar

post-image

Windows 8 မွာ Start Menu နဲ႔ Start Button ထည့္တဲ့
ေဆာ့၀ဲ ဗားရွင္းအသစ္ေလးပါ

ဗားရွင္းအေဟာင္းရဲ႕ Download လင့္ ေသသြားတဲ့အေၾကာင္း

Facebook က သူငယ္ခ်င္းတစ္ေယာက္ မွာသြားတဲ့အတြက္
အခု ဗားရွင္း 3.0 ကို တင္ေပးလိုက္တာပါ

အသံုးျပဳရတာကလည္း လြယ္ပါတယ္

Install လုပ္ၿပီးတာနဲ႔ Start Button ေတြ Start Menu ေတြကို
ကိုယ္ႀကိဳက္တာေရြးေပးလိုက္႐ံုပါပဲ


Freeware ေလးမို႔ Crack စရာမလိုပဲ အဆင္ေျပေျပနဲ႔ သံုးႏိုင္ပါတယ္
ကဲ .. လိုခ်င္တဲ့သူငယ္ခ်င္းမ်ား ေအာက္မွာ ေဒါင္းယူလိုက္ပါ


အဆင္ေျပပါေစဗ်ာ
နည္းပညာလမ္းေၾကာင္းေပၚကသူငယ္ခ်င္းအားလံုးကို ေလးစားခင္မင္လွ်က္
အိုင္တီမုဆိုး

Baca Selengkapnya ....

Google Search Result မွာ ကိုယ့္ရဲ႕ပံုေပၚေအာင္လုပ္နည္း

Posted by Unknown 0 komentar
ဒီပို႔စ္ကိုဖတ္မယ္ဆိုရင္ စိတ္ရွည္ရွည္ထားၿပီးမွ ဖတ္ဖို႔ အရင္ဆံုး ႀကိဳတင္ေတာင္းပန္ထားပါရေစ
ဘာေၾကာင့္လည္းဆိုေတာ့ ေတာ္ေတာ္ႀကီး အေသးစိပ္ေရးမွ ေတာ္ကာက်ႏိုင္မယ့္ နည္းပညာတစ္ခုျဖစ္ေနလို႔ပါ

အင္တာနက္အသံုးျပဳသူေတြဟာ ကိုယ္လိုခ်င္တဲ့ေဆာ့၀ဲေလးေတြ ဒါမွမဟုတ္ နည္းလမ္းေလးေတြကို google မွာ႐ိုက္ထည့္ၿပီး ရွာေဖြေလ့ရွိၾကတာ သဘာ၀ပါ ..

ဘာေၾကာင့္လဲဆိုေတာ့ Google ကို ဆရာမတင္ပဲ နည္းပညာတစ္ခု ထဲထဲ၀င္၀င္ သိလာႏိုင္ဖို႔ မလြယ္လို႔ပါ


အဲဒီလို google ရဲ႕အကူအညီနဲ႔ ရွာေဖြၾကတဲ့အခါ Google Search Engine ဟာ ကၽြန္ေတာ္တို႔႐ိုက္ထည့္လိုက္တဲ့စာလံုးေတြထဲက သက္ဆိုင္ရာ Key word ေတြနဲ႔ တိုက္ဆိုင္ရွာေဖြၿပီး Result ေတြကို ျပန္ထုတ္ေပးတာျဖစ္ပါတယ္

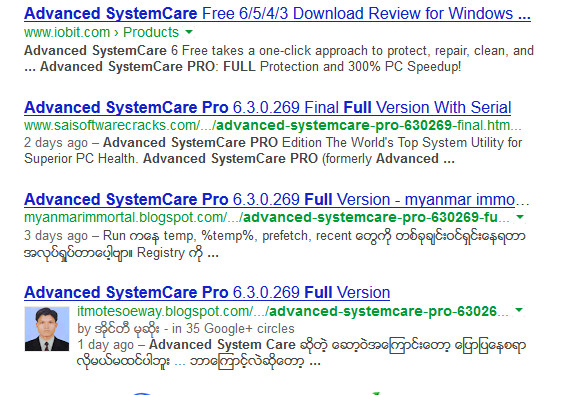
အဲဒီလိုေပၚလာတဲ့ Result ေတြထဲမွာ အနည္းငယ္မွ်ေသာ ပို႔စ္ပိုင္ရွင္ေတြရဲ႕ ပို႔စ္လင့္ေတြမွာ အဲဒီပို႔စ္ပိုင္ရွင္ရဲ႕ ပံုေလးေတြ တြဲပါေနတာမ်ိဳးကို သတိထားမိၾကမွာပါ ပို႔စ္နဲ႔အတူတြဲေပၚလာတဲ့ပံုကိုၾကည့္ၿပီး ၀င္ဖတ္သင့္မဖတ္သင့္ကို ကၽြန္ေတာ္တို႔ေတြရဲ႕ မသိစိတ္ထဲက ဆံုးျဖတ္ခ်က္ခ်ၾကပါတယ္

သာမန္ပို႔စ္လင့္ေတြထက္စာရင္ Author ရဲ႕ပံုေလးနဲ႔တြဲၿပီးပါလာတဲ့ ပို႔စ္လင့္ေတြကို ၀င္ေရာက္ဖတ္႐ႈဖို႔ကို အမ်ားဆံုးေရြးျခယ္ခံရေလ့ရွိတာဟာ အဆင္တန္ဆာအလွအပနဲ႔ သက္ေသသာဓက ဦးစားေပးတတ္တဲ့ လူေတြရဲ႕ ရင္တြင္းဗီဇေၾကာင့္ပဲလို႔ ေျပာရမွာျဖစ္ပါတယ္
ဒါဆိုရင္ Google ဟာ သူ႕ရဲ႕ Search Result မွာ ပို႔စ္ပိုင္ရွင္အားလံုးရဲ႕ ပံုေတြကိုတြဲထုတ္ေပးတာမဟုတ္ပဲ ဘာေၾကာင့္ အခ်ိဳ႕ရဲ႕ပံုေတြကိုပဲ သက္ဆိုင္ရာပို႔စ္လင့္နဲ႔အတူ တြဲထုတ္ေပးတာလဲ
ဟုတ္ကဲ့ .. အေျဖကေတာ့ရွင္းပါတယ္ .. အဲဒီပို႔စ္ကိုေရးလိုက္တဲ့သူဟာ အဲဒီပံုပိုင္ရွင္ အမွန္တကယ္ျဖစ္ပါတယ္လို႔ google search engine က အသိအမွတ္ျပဳေအာင္ လုပ္ထားတဲ့သူဆိုရင္ Google ရဲ႕ Search Result မွာ ပို႔စ္လင့္နဲ႔အတူ အဲဒီပို႔စ္ပိုင္ရွင္ရဲ႕ပံုကို ယွဥ္တြဲေဖာ္ျပေပးမွာ ျဖစ္ပါတယ္ ..

အခုေနရာအထိ ဘာကိုေျပာေနတာမွန္းမသိေသးဘူးဆိုရင္ Browser ရဲ႕ Address Bar မွာ ကၽြန္ေတာ့္ဘေလာ့ထဲက ပို႔စ္နံမည္တစ္ခုခုကို ႐ိုက္ထည့္ၿပီး ရွာၾကည့္လိုက္ပါ ေပၚလာတဲ့ Result ေတြထဲမွာ အျခားေသာပို႔စ္ေတြနဲ႔အတူ ကၽြန္ေတာ့္ရဲ႕ပို႔စ္လင့္ကို ေဖာ္ျပေပးလာမွာျဖစ္ၿပီး ကၽြန္ေတာ့္ပို႔စ္လင့္ရဲ႕ေရွ႕မွာ ကၽြန္ေတာ့္ရဲ႕ပံုကို ယွဥ္တြဲေဖာ္ျပေပးထားတာကို ေတြ႕ရပါလိမ့္မယ္ ...

 ေအာက္ကပံုမွာျပထားတဲ့ Google Search Result ကို ၾကည့္ႏိုင္ပါတယ္


ကဲ .. ဒီပို႔စ္ေလးမွာေတာ့ Google Search Result မွာ ကိုယ့္ရဲ႕ပို႔စ္နဲ႔အတူ ကိုယ့္ရဲ႕ပံုကိုပါ တြဲလ်က္ေဖာ္ျပေပးေအာင္လုပ္တဲ့ နည္းပညာေလးကို မွ်ေ၀ေပးမွာျဖစ္ပါတယ္

ဒီနည္းလမ္းအတြက္ လိုအပ္တဲ့ ႀကိဳတင္ျပင္ဆင္မႈေတြကို အရင္ဆံုးလုပ္ထားရပါမယ္ အရင္ဆံုး ကိုယ့္ရဲ႕ဘေလာ့ကို Google မွာ Submit လုပ္ထားရပါမယ္ ကိုယ့္ရဲ႕ဘေလာ့ကို Submit လုပ္တဲ့နည္းကိုေတာ့ ဒီပို႔စ္ မွာ သြားဖတ္ႏိုင္ပါတယ္

ကိုယ့္ရဲ႕ဘေလာ့ကို Google Search Engine မွာ ေအာင္ေအာင္ျမင္ျမင္နဲ႔ Submit လုပ္ၿပီးသြားၿပီဆိုရင္ ကိုယ့္ရဲ႕ဘေလာ့ကို ေရးထားတဲ့ gmail အေကာင့္နဲ႔ Google + အေကာင့္ရွိေအာင္လုပ္ထားရပါမယ္

ဒါကေတာ့ လြယ္ပါတယ္ gmail အေကာင့္ထဲမွာ +You ဆိုတာကိုႏွိပ္ၿပီးအေကာင့္လုပ္ရင္လည္းရသလို Blogger Dashboard မွာလည္း Google+ ဆိုတာေလးကိုႏွိပ္လိုက္ၿပီး Google+ အေကာင့္လုပ္ႏိုင္ပါတယ္

 ကဲ .. Google+ အေကာင့္ထဲကို ၀င္လိုက္ပါ Google+ မွာတင္ထားတဲ့ Profile ပံုနဲ႔ Blog မွာတင္ထားတဲ့ profile ပံုကို တစ္ခုတည္းအတူတူျဖစ္ေအာင္လုပ္ပါ
 ၿပီးေတာ့ အဲဒီပံုဟာလည္း ဦးေခါင္းပိုင္းနဲ႔မ်က္ႏွာကို သိသိသာသာျမင္ႏိုင္တဲ့ပံုမ်ိဳးျဖစ္ရပါမယ္ ( Gravator [ Globle Recoganized Avator ] ဆိုတဲ့ ကမာၻက လူသားမ်က္ႏွာလို႔ အသိအမွတ္ျပဳထားတဲ့ပံုမ်ိဳးျဖစ္ရပါမယ္)

Google+ အေကာင့္ထဲကို ေရာက္ၿပီဆိုရင္ Address Bar မွာရွိတဲ့ လင့္ကို ကူးယူပါ အဲဒီလင့္ထဲက ကိုယ့္ Google+ အေကာင့္ရဲ႕ ID ကို ကူးယူပါ
ဥပမာ - ကၽြန္ေတာ့္ Google+ အေကာင့္မွာရွိတဲ့လင့္က အဲဒီထဲက ကၽြန္ေတာ့္ရဲ႕ ID ျဖစ္တဲ့ ကိုပဲ ကူးယူထားလိုက္ပါတယ္


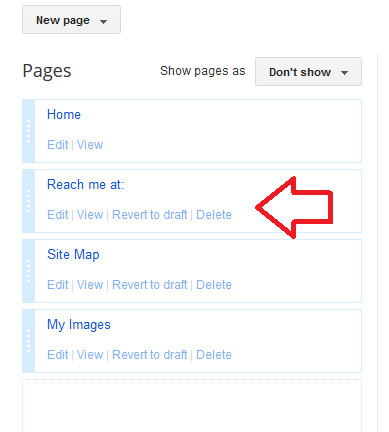
 ၿပီးရင္ ကိုယ့္ဘေလာ့ကို ျပန္သြားပါ Dashboard ကေန Pages ကိုႏွိပ္ၿပီး New page ကေန blank page ကိုယူပါ Page Title မွာ ႀကိဳက္တာထည့္ပါ ..
ဥပမာ - ကၽြန္ေတာ္ကေတာ့ Reach me at ေပါ့


အဲဒီ Page မွာ HTML mode ကေန ေအာက္မွာေပးထားတဲ့ကုဒ္ေတြကို ထည့္ေပးပါ


<a
href="https://profiles.google.com/ဒီေနရာမွာကိုယ့္ရဲ႕ G+ ID" rel="me">My Google+ Profile</a>


ေအာက္ပံုကို နမူနာၾကည့္ပါ


အဲဒါကေတာ့ ကၽြန္ေတာ့္ရဲ႕ Page မွာသံုးထားတဲ့ကုဒ္ပါ အေပၚက ကုဒ္ေတြကေတာ့ ကၽြန္ေတာ့္ရဲ႕ ပံုကိုပါ ေရာတင္ထားတဲ့ကုဒ္ေတြပါ။ အဓိကက်တာေတာ့ အျပာေရာင္နဲ႔ ျခယ္ျပထားတဲ့ ကုဒ္ေတြပါပဲ

ၿပီးရင္ေတာ့ Publish ကိုႏွိပ္ပါ ၿပီးသြားရင္ View ကိုႏွိပ္ၿပီး အဲဒီ Page ရဲ႕ လင့္ကိုကူးယူထားပါ (ဒီလင့္ကို သိမ္းထားပါ ေအာက္ကအဆင့္တစ္ခုမွာ ဒီလင့္ကို ယူသံုးမွာပါ)

 ေနာက္တစ္ဆင့္အေနနဲ႔ကေတာ့ ကိုယ့္ဘေလာ့ရဲ႕ Layout ကေန ႀကိဳက္တဲ့ေနရာက Add a widget ကိုယူပါ HTML/Java Script ကိုေရြးၿပီး Title မွာ ဘာမွမထည့္ပဲ Content မွာ ေအာက္ကကုဒ္ေတြကိုထည္ေပးပါ


<a
href="https://plus.google.com/
ဒီေနရာမွာ ကိုယ့္ရဲ႕ G+ ID"
rel="author" target="blank">Join me on
Google+</a>


 Join me on Google+ ဆိုတဲ့စာသားေနရာမွာ ကိုယ္ႀကိဳက္တာေျပာင္းေရးႏိုင္ပါတယ္ ၿပီးရင္ေတာ့ Save ကိုႏွိပ္ၿပီး အဲဒီ Widget ကို ထားခ်င္တဲ့ေနရာမွာ ထားလိုက္ပါ
 ၿပီးရင္ .. ( စိတ္ရွည္ရွည္ထားၿပီးမွ ဖတ္ပါလို႔ ေျပားထားၿပီးသားေနာ .. ဒါဗ်ဲ .. :) )
 ၿပီးရင္ Google+ အေကာင့္ထဲကို ျပန္၀င္ပါ ၿပီးရင္ About ကိုႏွိပ္ပါ

ပြင့္လာတဲ့ထဲက ေအာက္ဆံုးနားေလးက Links ဆိုတဲ့ Box ရဲ႕ေအာက္ေဒါင့္နားေလးက Edit ကိုႏွိပ္ပါ


 အဲဒီ edit ဆိုတာကိုႏွိပ္ၿပီး ပြင့္လာတဲ့ထဲက Contributor အကြက္ထဲက နံမည္မွာကိုယ္ႀကိဳက္တာထည့္ၿပီး လင့္မွာေတာ့ ကိုယ့္ဘေလာ့ရဲ႕ About me ဆိုတဲ့ Page ရဲ႕လင့္ကို ထည့္ေပးပါ

 ၿပီးရင္ေတာ့ Save ကိုႏွိပ္ေပးလိုက္ပါ ၿပီးရင္ .. ဟဲဟဲ .. အားေတာင္နာလာၿပီ .. ဘေလာ့ရဲ႕ Layout ကေန Google+ နဲ႔ဆိုင္တဲ့ Widget ေတြကို အားလံုးထည့္ေပးထားပါ


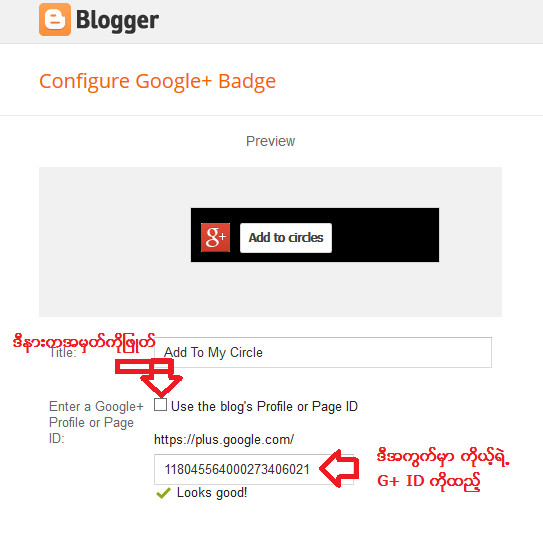
အဲဒီ Widget ေတြထဲက Google+ Badge ဆိုတဲ့ Widget ကို ယူတဲ့ေနရာမွာေတာ့ ေအာက္ကပံုအတိုင္း
လုပ္ေပးရပါမယ္


အဲဒီပံုထဲက ကၽြန္ေတာ္ျမွားျပထားတာကေတာ့ ကိုယ့္ရဲ႕ Google+ ရဲ႕ ID ကိုထည့္ေပးရမွာျဖစ္ပါတယ္ ၿပီးရင္ေတာ့ အဲဒီ Widget ကို Save လုပ္လိုက္ေပါ့

ကဲ ..ဒါဆိုရင္ေတာ့ ၿပီးသြားပါၿပီ
ရက္အနည္းငယ္ေလာက္ေတာ့ ေစာင့္ရပါတယ္
ကံေကာင္းရင္ေတာ့ ခ်က္ခ်င္းရတဲ့သူအခ်ိဳ႕ရွိပါတယ္ ကၽြန္ေတာ္ကေတာ့ သံုးပတ္ေလာက္ေစာင့္ၿပီးမွ အဆင္ေျပပါတယ္
Google Crawl လုပ္ၿပီးသြားရင္ေတာ့ Google မွာ ကိုယ့္ဘေလာ့ပို႔စ္ရဲ႕ေခါင္းစဥ္တစ္ခုခုထဲက စာလံုးအခ်ိဳ႕ကို Search Bar မွာ႐ိုက္ထည့္ၿပီး ရွာၾကည့္ပါ ..
ကိုယ့္ေရးတဲ့ပို႔စ္လင့္က်လာခဲ့ရင္ ကိုယ့္ရဲ႕ပံုေလးနဲ႔အတူ ေပၚေနမွာျဖစ္ပါတယ္
ပို႔စ္က ရွည္လြန္းတာရယ္ လုပ္ရမယ့္အဆင့္ေတြက မ်ားျပားလြန္းတာရယ္ေၾကာင့္ ဒီပို႔စ္ကို ေဘးမွာထားၿပီး တစ္ဆင့္ခ်င္းဖတ္ရင္း လုပ္ႏိုင္ေအာင္လို႔ အခုပို႔စ္ကိုပဲ pdf ဖိုင္ေလးလုပ္ၿပီး တင္ေပးထားပါမယ္
လိုခ်င္တဲ့သူငယ္ခ်င္းမ်ား ေအာက္မွာေဒါင္းယူႏိုင္ပါတယ္


 ကဲ .. အဆင္ေျပပါေစဗ်ာ

နည္းပညာလမ္းေၾကာင္းေပၚကသူငယ္ခ်င္းအားလံုးကို ေလးစားခင္မင္လွ်က္ အိုင္တီမုဆိုး

Baca Selengkapnya ....

Folder Lcok 7.2.2 Final Full Version

Posted by Unknown Minggu, 23 Juni 2013 0 komentar
Folder Lock ဆိုတဲ့ေဆာ့၀ဲေလးအေၾကာင္းကို ဒီပို႔စ္ 

မွာေရးခဲ့ဖူးပါတယ္

အခုေတာ့ ေနာက္ဆံုးထြက္ဗားရွင္းေလးရလာလို႔
တင္ေပးလိုက္ပါတယ္

တျခားသူေတြကို ဖြင့္မၾကည့္ေစလိုတဲ့ ဖိုင္ေတြကို
အလံုၿခံဳဆံုးျဖစ္ေအာင္ သိမ္းဆည္းကြယ္၀ွက္ေပးထားမယ့္
ေဆာ့၀ဲေလးတစ္ခုပါ ...


ကဲ .. လိုခ်င္တဲ့သူငယ္ခ်င္းမ်ား ေအာက္မွာ ေဒါင္းယူႏိုင္ပါတယ္


ေဒါင္းၿပီးရင္ Setup ဖိုင္ကို Run ၿပီး Install လုပ္လိုက္ပါ
Install ၿပီးတဲ့အခါ ပ႐ိုဂရမ္ကို မ Run ေစပဲ ပိတ္လိုက္ပါ
အင္တာနက္ကြန္နက္ရွင္ကိုလည္း ပိတ္လိုက္ပါ
ၿပီးရင္ medicine ဆိုတဲ့ဖိုဒါထဲက Activator ဆိုတဲ့ဖိုဒါထဲမွာရွိတဲ့ Batch ဖိုင္ကို အရင္ Run လိုက္ပါ
Command Prompt ၀င္းဒိုးေလးပြင့္လာပါမယ္
ႀကိဳက္တဲ့ ကီးကို ႏွိပ္ေပးလိုက္ပါ အဲဒီ ၀င္းဒိုးေလး ပိတ္သြားပါမယ္
ၿပီးရင္ Folder Lock ကို Run လိုက္ပါ ပြင့္လာတဲ့ထဲက Help and support ကိုႏွိပ္ၿပီး က်လာတဲ့ထဲက
Register ကို ႏွိပ္လိုက္ပါ


အဲဒီလို Register ကိုႏွိပ္လိုက္ရင္ ေအာက္ကပံုအတိုင္း ပြင့္လာပါမယ္


အဲဒီထဲက Serial Number အကြက္နဲ႔ Registration key ထည့္ရမယ့္အကြက္ထဲမွာေတာ့ notepad ဖိုင္ေလးနဲ႔ ေပးထားတဲ့ထဲက ႀကိဳက္တဲ့ အတြဲကို ကူးယူၿပီးထည့္လိုက္ပါ
ၿပီးရင္ေတာ့ Submit ကို ႏွိပ္ေပးလိုက္ပါ
ဒါဆိုရင္ Full Version အျဖစ္ သံုးလို႔ရသြားပါၿပီ
Batch ဖိုင္ကို အရင္ မ Run ပဲ ကီးေတြထည့္ရင္ Registration မေအာင္ျမင္ပါဘူး
အဲဒီ Batch ဖိုင္ကလည္း ၀င္းဒိုးစနစ္ထဲက Host ဖိုင္ကို ဒီေဆာ့၀ဲအတြက္ modify လုပ္ေပးဖို႔ ေရးထားတဲ့ Batch ဖိုင္မို႔ အခုကၽြန္ေတာ္တင္ေပးထားတဲ့ Batch ဖိုင္အတြက္ ဗိုင္းရပ္ကင္းစင္ေၾကာင္း အာမခံပါတယ္
ကဲ .. အဆင္ေျပၾကပါေစဗ်ာ

နည္းပညာလမ္းေၾကာင္းေပၚကသူငယ္ခ်င္းအားလံုးကို ေလးစားခင္မင္လွ်က္
အိုင္တီမုဆိုး


 Folder Lock 7.2.2 final


Folder Lock is fast file-security software that can password-protect, lock, hide, and encrypt any number of files, folders, drives, pictures, and documents in seconds. Locked files are undeletable, unrenamable, unmovable, hidden, and inaccessible. You can lock, scramble, or encrypt depending on speed and security. Folder Lock is fully portable, so you can protect your files on USB flash drives, disks, CD-RWs, notebooks, and hard disks, and it doesn't require installation on another PC. Folder Lock protects files in Windows, DOS, and Safe modes, even when you change your OS or boot from a disk. Folder Lock doesn't let you delete its own program folder, and it can't be uninstalled without the correct password. Additional options include Stealth Mode, Hacker Attempt Monitoring, Shred files, AutoLock, Auto Shutdown PC, Lock your PC, Erase PC tracks, 256-bit Blowfish Encryption and Context Menu in Explorer.

Encrypt Files
Encrypt your personal files using 256-bit on-the-fly encryption technology totally dynamic and fool-proof.

Protect USB / CD
Convert your encrypted storages into executables and take your portable drives anywhere.

Make Wallets
Store sensitive information in encrypted form. A safe haven for private info like Credit Cards and Bank Accounts.
Run Application in complete Stealth.
Don't let anyone know you ever installed Folder Lock on your PC.

Password Security
Restrict access to various parts of the application with use of admin level master password.

Auto Protection
Set inactivity based security policy in order to secure everything when you're away from your PC.

Hack Security
Don't let hackers use dictionary attacks. Monitor, control and perform actions on incorrect password attempts.

Shred Files
Shred and permanently delete restorable files, folders and drives and even empty hard drive space.

Lock Files
Protect important files from unwanted access by blocking visibility or access to files, folders and drives.

Backup Online
Backup all your encrypted files automatically to an online storage and easily restore it back.

Download the program included serial and activator from the below link.


Be enjoy! :)

Baca Selengkapnya ....

Advanced SystemCare Pro 6.3.0.269 Full Version

Posted by Unknown Sabtu, 22 Juni 2013 0 komentar
Advanced System Care ဆိုတဲ့ ေဆာ့၀ဲအေၾကာင္းေတာ့
ေျပာျပေနစရာ လိုမယ္မထင္ပါဘူး ...

ဘာေၾကာင့္လဲဆိုေတာ့ ကၽြန္ေတာ္တို႔ ျမန္မာႏိုင္ငံသားေတြ
အႀကိဳက္ေတြ႕ၿပီး အသံုးမ်ားတဲ့ ကြန္ပ်ဴတာျမန္ဆန္သြက္လက္ေရး
ေဆာ့၀ဲတစ္ခုျဖစ္ေနလို႔ပါ

ကြန္ပ်ဴတာထဲမွာရွိတဲ့ အမႈိက္ဖိုင္ေတြကို အခ်ိန္မွန္ ရွာေဖြရွင္းလင္းေပးတာေတြ
Registry ကို စစ္ေဆးျပဳျပင္ေပးတာေတြ ၀င္းဒိုး Shut down နဲ႔ Start up ရဲ႕ ျမန္ဆန္သြက္လက္စြာ ၿပီးေျမာက္ႏိုင္ေရးကို
စီစဥ္ေပးႏိုင္တာ စတဲ့ အေရးႀကီးလုပ္ေဆာင္ခ်က္ေတြအျပင္ အင္တာနက္ကြန္နက္ရွင္ကို


သာမန္ထက္ပိုၿပီး ျမန္ႏႈန္းျမင့္ေအာင္ ျပဳျပင္ခ်ိန္ၫွိေပးတာမ်ိဳးႏွစ္သက္စရာ လုပ္ေဆာင္ခ်က္ေတြ
အမ်ားအျပားပါ၀င္ေနတာေၾကာင့္ လူႀကိဳက္မ်ားတဲ့ ေဆာ့၀ဲေလးတစ္မ်ိဳးလို႔ ဆိုရမွာျဖစ္ပါတယ္
ကဲ .. လိုခ်င္တဲ့သူငယ္ခ်င္းမ်ား ေအာက္မွာေဒါင္းယူႏိုင္ပါတယ္


ေဒါင္းၿပီးရင္ေတာ့ Setup ဖိုင္ကို Install လုပ္လိုက္ပါ
Install လုပ္ၿပီးရင္ေတာ့ ပ႐ိုဂရမ္ကို Run လိုက္ၿပီး ပြင့္လာတဲ့ Box ေတြကို
ေအာက္ကပံုေရာက္တဲ့အထိ Next ေတြခ်ည္းပဲ ႏွိပ္ေပးသြားလိုက္ပါ


အဲဒီအဆင့္ကိုေရာက္ရင္ေတာ့ Upgrade ကို ႏွိပ္လိုက္ပါ
ေအာက္ကပံုအတိုင္း ပြင့္လာပါလိမ့္မယ္


အဲဒီထဲက Enter License ကိုႏွိပ္ေပးလိုက္ပါ
ေနာက္ထပ္ပြင့္လာတဲ့ အကြက္ထဲမွာထည့္ဖုိ႔ လိုင္စင္ကီးကိုေတာ့ keygen ဖိုဒါထဲက keygen ဖိုင္ကို Run ၿပီး
ကူးယူထည့္လိုက္ပါ
ၿပီးရင္ေတာ့ Activate ဆိုတာကို ႏွိပ္ေပးလုိက္တာနဲ႔ အေပၚဘားတန္းမွာ ေပၚေနတဲ့ Free ဆိုတဲ့စာသားေလးအစား
Pro လို႔ ေျပာင္းသြားၿပီး Full Version အျဖစ္ အသံုးျပဳလို႔ ရသြားပါၿပီ
ကဲ .. အဆင္ေျပပါေစဗ်ာ

နည္းပညာလမ္းေၾကာင္းေပၚကသူငယ္ခ်င္းအားလံုးကို ေလးစားခင္မင္လွ်က္
အိုင္တီမုဆိုး


Advanced SystemCare Pro 6.3.0.269


Advanced SystemCare Pro - analyzes the system and then optimizes your system configuration, including changes in the optimal security settings, deletes system of Spyware and Adware, corrects errors in the registry and deletes temporary files, optimizes internet connection allows you to manage autoloading applications, Defrag File System, etc. etc. With the power of this program you can clean your computer from spyware and adware, detect and eliminate possible threats in advance and a security breach the OS to fix bugs in the system registry, clean up temporary and unwanted files, manage lists, autoloads, optimize system performance.

Key features:
• Increased performance and reliability
• A powerful defragmentation and optimization of hard disk drives
• Clean and optimize the system registry
• Works automatically in the background
• Protecting the system from spyware and malware
• Fast and thorough cleaning of debris from hard drives
• Improve the performance of your PC
• Fix a number of system errors
• Multilingual user interface, including the Russian language.

What's new?
+ Added support for Windows 8 Consumer Preview
+ Optimized "PC Health" and "Performance Monitor"
+ Optimized the UI and function of notification
+ Improved "Privacy Sweep"
+ Optimized "Turbo Boost"
+ Optimized "Registry Fix", "Malware Removal", "System Optimization", "Disk Defragment" and "Shortcut Fix"
+ Added and updated multiple languages
+ Enhanced tools such as "Disk Cleaner", "Cloned Files Scanner"
+ Updated driver database
+ Updated the database of malware
* Fixed general bugs Errors
Download the program from the link below.


Be enjoy! :)

Baca Selengkapnya ....
Trik SEO Terbaru support Online Shop Baju Wanita - Original design by Bamz | Copyright of android themes.